5/12/2022

How to Fix Western Digital Caviar Green Bug

how to fix western digital caviar green
This information will be of interest to all those who use hard drives Western Digital Caviar Green range. Recently I discovered that these discs suffer a number of problems with no official solution from Western Digital that many people are unaware, and that could eventually cause serious data loss.

Guide Preview of Fixing Western Digital Caviar Green Bug

There are three main problems:
  • LCC and RAID: affects ALL WD Caviar Green, without exception everyone who has a Caviar Green has to apply the solution of the LCC, and if it has it in RAID, also apply the solution for RAID..
  • Poor performance: affects some specific models If your hard drive has a ridiculous performance, try to process an RMA because there is nosolution.

1. Poor Performance

After formatting, all hard drives work well and have optimal performance. But over time, especially as it is giving them use, begin to suffer performance problems. In the official forums there are users that Western Digital announced poor transfer speeds around 2MB / s, freezing and even system crashes.

Models affected:
  • WD15EADS (1.5TB 32MB cache), especially 00P8B0 submodel (except submodel 00R6B0)
  • WD15EARS (1.5TB 64MB cache), especially 00P8B0 submodel (except submodel 00R6B0)
  • WD20EADS (2TB 32MB cache), especially 00P8B0 submodel (except submodel 00R6B0)
References:
Many manufacturers of NAS devices these models have withdrawn their compatibility lists. Synology NAS indicates that its only support the submodel 00R6B0 of these discs, which is the only unaffected.

Thecus has eliminated them directly from your list.Indicated on your QNAP compatibility list that have problems WD15EADS slowdowns, crashes and poor performance.
- http://www.synology....u&product_id=63
- http://wiki.qnap.com...Hard_Drives (3.5

No solution

2 Death excess heads parked (LCC)

To save energy, the entire range Caviar Green uses a somewhat aggressive but fairly common method, consisting park the heads in the security zone once after some time of inactivity. 
The problem is that the parked is configured to be done every 8 seconds! Hard drives support a maximum number of heads parked over its lifetime, and in the case of Green Caviar parked 300,000 guaranteed operations before mechanical failure occurs.

The number of times a disc parks the heads is registered by the value of "Load Cycle Count" (or LCC) of SMART. Users have detected a rapid increase in this value, calculating that in less than two years may exceed the figure of the 300,000estimated to be parked within the lifetime of a disk, with only about 4 or 5 hours of use. 
In my case, my hard drive is connected just a few minutes a week to back up and dump some data, and in a year I have planted a value of 10413 (the number of hours indicates the SMART not block me and I do not think it's right above):
 ID # FLAG VALUE WORST THRESH ATTRIBUTE_NAME TYPE UPDATED WHEN_FAILED RAW_VALUE
   1 Raw_Read_Error_Rate 0x002f 200 200 051 Pre-fail Always - 0
   3 Spin_Up_Time 0x0027 143 141 021 Pre-fail Always - 9808
   4 Start_Stop_Count Old_age 0x0032 100 100 000 Always - 991
   5 Reallocated_Sector_Ct 0x0033 200 200 140 Pre-fail Always - 0
   7 100 253 000 0x002e Seek_Error_Rate Old_age Always - 0
   9 Power_On_Hours Old_age 0x0032 099 099 000 Always - 827
  10 Spin_Retry_Count Old_age 0x0032 100 100 000 Always - 0
  11 Calibration_Retry_Count Old_age 0x0032 100 100 000 Always - 0
  12 Power_Cycle_Count Old_age 0x0032 100 100 000 Always - 421
 Power-Off_Retract_Count 0x0032 192 200 200 000 Old_age Always - 36
 Load_Cycle_Count 0x0032 193 197 197 000 Old_age Always - 10413
 Temperature_Celsius 0x0022 194 124 104 000 Old_age Always - 28
 Reallocated_Event_Count 0x0032 196 200 200 000 Old_age Always - 0
 Current_Pending_Sector 0x0032 197 200 200 000 Old_age Always - 0
 Offline_Uncorrectable 0x0030 198 200 200 000 Old_age Offline - 0
 UDMA_CRC_Error_Count 0x0032 199 200 200 000 Old_age Always - 1
 Multi_Zone_Error_Rate 0x0008 200 200 200 000 Old_age Offline - 0
Models affected:
- All Western Digital Caviar Green

Solution:
  1. - Lower the WDIDLE3 utility Western Digital page: http://support.wdc.c...sid=113&lang=en
  2. - Copy the utility to a floppy disk, CD or USB boot with MsDOS or FreeDOS
  3. - Switch off all PC hard disks, connected to plate and let only those who want to fix
  4. - Start in MsDOS / FreeDOS and run:   wdidle3.exe / s300 
Sometimes it seems that there are problems with the parameter according to the version of the tool. If it does not work with "/ s300" test with a space in between, "/ s 300".
NOTE: In many places it is suggested to use the parameter "/ d" to completely disable the function, but this seems to cause major performance problems, and in some cases parked constant heads, so we recommend using "/ s 300" to set the time parked head to 5 minutes, which is the maximum allowed.
References:
  1. - http://www.timoroso.com/journal/9
  2. - http: //community.wdc.../highlight/true
  3. - http: //chbits.blogsp...wdtler-and.html

The WDIDLE3 utility can be used safely in the following models:
RE Drives - WD1000FYPS-01ZKB0, WD7500AYPS-01ZKB0, WD7501AYPS-01ZKB0
GP Drives - WD20EADS, WD20EARS, WD15EADS, WD15EARS, WD10EADS, WD10EARS, WD8000AARS,
WD7500AADS, WD7500AARS, WD6400AADS, WD6400AARS, WD5000AADS, WD5000AARS

3 Corruption of RAID Volume

This problem only affects other users wishing to use these hard drives in RAID. Western Digital Caviar Green warns that the range does not support RAID volumes, and it invites us to buy the business range RE-4, significantly more expensive. The real reason is given by the way in which the Green Caviar errors manage read / write.

All hard drives have an additional space sectors beyond the actual disk space. These additional sectors are used to relocate information when a problem is detected in a physical area of ​​the disc. 
For example, if you type in the field # 10 problems are detected, it is marked as invalid and relocated to a reserve sector. The same goes for reading, trying to retrieve the information from the damaged area and relocating it once it has been achieved (recoverable error).

These operations take a hardly predictable time, from a few seconds to several minutes.'s Problem for a RAID volume is expected to answer the hard drive within a limited time, usually around 10 seconds. If there is a disc that appears to be frozen or no response after a read / write, the RAID controller is marked as invalid and calls for its replacement and rebuilding the RAID volume. 
Use Caviar Green hard drives in RAID can lead to problems data loss because it can do that to a recoverable error, the RAID controller discard the hard disk and marked as invalid. If a RAID-0 we will have a big problem, and if it is a tolerant RAID on a hard drive and drop two also.

The solution is to limit the time of data recovery. That is, what matters is that the hard drive try to make a quick recovery of the sector, and if this is not possible before the problem rises when the RAID controller so that it is she who makes the decision of proper recovery. Here's how the disks are configured in the RE-4 range, cutting recovery by 7-8 seconds.

Models affected:
- All Western Digital Caviar Green

Solution:

- Lower the WDTLER usefulness of this page: http: //shifteightgen...top-hard-drives
- Copy the utility to a floppy disk, CD or USB boot with MsDOS or FreeDOS
- Switch off all PC hard disks, connected to plate and let only those who want to fix
- Start in MsDOS / FreeDOS
- Run First "tlerscan.exe"
- Execute after "tler_on.exe"

References:
- http: //shifteightgen...top-hard-drives
- http: //chbits.blogsp...wdtler-and.html
-------------------------
And the silence from Western Digital about this problem is worrying.
PS: I made some screenshots (before reconfiguring the idle3) SMART values ​​Caviar Green (WD10EARS) and another WD (WD3200AAKS) to use with the operating system for 2 years.

WD10EARS Caviar Green:
WD10EARS Caviar Green

WD3200AAKS:

In those 8 hours of actual use (I plug just to make backups, e-sata via a dock), the Caviar Green had 234 "parked" head.The other for 430 days and 20 hours of use is 1455.
Eloquent.

Install & config + unboxing G-Lab Korp Thallium 7.1 surround


The G-Lab Korp Thallium headset is perfect for LAN gaming and maximizing your playability. The memory foam has been designed with a slight angle of 5º for a perfect and pleasant support for long games.

To live in the heart of the game! Its ultra-limiting shape has been designed to propel you into the heart of the action. 

Headphone light can be removed


I've only used them a couple of times yet, but they're comfortable (if you're not used to this type of headphones they'll be a bit heavy) and you can hear them perfectly. The ambient noise cancellation of the microphone also works quite well.

THE G-LAB Korp THALLIUM
What I liked the most is the comfort of the pads and that you can remove the ambient lights from the headphones with the larger button. This is something that is appreciated because I personally hate that so many useless lights cannot be turned off for many. Whoever wants to use it, perfect, but those of us who don't want it want to be able to turn it off and in these headphones you can.

To keep in mind: they are not wireless, but cable (USB) in case this is a problem for someone, but I think the vast majority of us who do want cable.

I only see one drawback, for me, I think they weigh too much, when you put them on you can see that they are heavy, although in the end you get used to it. I cannot compare them with others because they are my first helmets of this style and they all weigh the same.

Nothing to envy to expensive brands

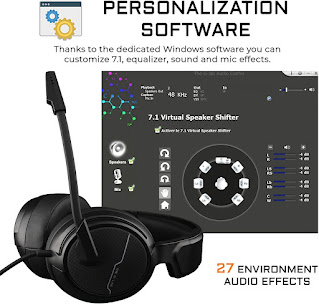
Quite good sound and the microphone also sounds very good, you can download the application of the headphones to customize and even within the program you can modify your voice and put different effects on it, in general I totally recommend them, it includes a command in the same key to be able to regulate the basic settings quickly, I would buy them again without hesitation.

Characteristic:

  • 7.1 digital surround sound system. Increase ALL your gaming potential with this surround sound by Korp Thallium. 7.1 multi-channel sound technology build to offers precise and faithful spatialization of all the sound effects of your favorite games. 
    You will be able to detect the source of every footstep sound, every explosion and everything else that happens in your game. Customize all sound effects with its dedicated Windows software.
  • A noise reduction microphone.  Make sure you transmit the correct information to your team: thanks to its noise reduction microphone, Korp Thallium will be the best ally of your team. Noise reduction technology filters out distant noise, so all distant clutter is more accurately captured by nearby sounds. The sound of your voice will be more accurate and you will be sure that your message will be received 5/5.
  • Total isolation.  Combined with a closed design and memory ear cushions that fit perfectly in your ear, you'll be fully immersed in your game and able to fully focus on your goal: victory. Its arch is padded and offers a durable, ultra comfortable and light use. Whether you are at home or on Lan, Korp Thalium will become your most valuable ally.
  • Extreme customization.  Thanks to its dedicated Windows software, you can customize the parameters of the audio equalizer, the effects of the microphones, the volume and the spatialization of the sound for optimal communication. Experience the full power of the game with 7.1 surround sound and adjust the sound source to hear all game sounds more clearly!
  • Powerful bases.  Its an X-TRA bass technology made to offer a deep, distortion-free and perfectly well balanced sound.
  • RGB.  The Korp Thallium is RGB backlit. In addition to its sleek design, it fits seamlessly into your gaming setup.
  • memory foam  Its ultra-closed shape and memory foam guarantee comfort for long games!
  • With remote control.  Adjust the sound, instantly mute the mic, and quickly turn off the backlight by pressing the button on the remote.
  • Compatible with PC & PS4.  Connect the headset directly to USB on your PS4 or PC.

Specifications The G-Lab Korp Thallium:

  • Performance
      official software for korp thallium
    • Product Type: Headphones
    • Wearing Style: Headband
    • Recommended use: Gaming
    • Headphone Type: Binaural
    • Product Color: Black
    • Volume Control: Button
    • Controls Type: Cable Control Box
    • Control Type: Buttons
    • Cord length: 2.3m
    • Wire Color: Black
    • Backlight: Yes
    • Backlight Color: Red/Green/Blue
    • Compatible Products: PS4, PC
  • Ports and Interfaces
    • Connectivity Technology: Wired
    • 3.5mm jack: No
    • USB connection: Yes
    • Bluetooth: No
  • Headphones
    • Headphones: Supraaural
    • Headphone frequency: 20 - 20000 Hz
    • Obstruction: 32 Ohm
    • Headphone sensitivity: 100 dB
    • Drive unit: 5cm
  • Microphone
    • Microphone type: Integrated
    • Microphone output impedance: 2200 Ohm
    • Noise canceling effect: Yes
  • Weight and measurements
    • Weight: 315g
  • Other features
    • Audio output channels: 7.1 channels
    • 2.5mm jack: No

5/09/2022

10 tricks to optimize your SSD and improve its performance

If already, with an SSD we take more advantage of our equipment, here we are going to give you some tips so that you get more performance from these disks.


See the best sellers in Internal Solid-State Drives.

Your PC still doesn't have an SSD? Admit it, your computer is from another era, that of slowed computers and the internet at a snail's pace. Whether laptop or desktop, a computer with a Solid State Disk or SSD disk is the best option to fly over the network. If you want to optimize your SSD to reach its maximum speed, follow these 10 tricks that we give you below. 

Read about external storage with wifi

What is an SSD?

optimize your SSD
Imagen de PagDev en Pixabay
For those who do not know very well what these types of disks are, they are data storage units, like a normal hard disk, but with higher performance and faster writing and reading speeds. They have no moving parts, so they are more resistant to shocks. The fact of having very low latency and access times makes them perform much better. All this is thanks to its flash memory, which differs from plates or magnetic disks in those conventional hard drives use.

Solid state hard drives or SSDs can reach speeds up to 100 times faster than a “normal” disk, just like the next generation NVMe PCIe 4.0 SSD drives. The writing speed in these cases reaches up to 7000 MB / s, something that is impossible to achieve with a hard disk of a lifetime. To reach these quotas, it is essential to know how to configure your SSD, but do not worry, because today we are here for that. 

Whether you have an SSD installed on your computer or if you are thinking of installing it, here we are going to give you some recommendations so that you can speed up your hard drive. In addition, we are also going to give you some tips to increase the life of your SSD, something that should be taken into account. Some of the notes that we are going to give you next carry a certain level of knowledge regarding the fiddling of the configuration of your computer.

1. Speed ​​up your SSD by enabling AHCI 

The AHCI (Advanced Host Controller Interface) is the Advanced Host Controller Interface. It is important that this is active if we want our Windows to favor our SSD so that it performs more. To enable this option, we must access from the computer's BIOS and activate it from the configuration or settings. In any case, if it can be, it is better to activate the AHCI before installing Windows on our PC. 

If it is not possible, there would be no problem as long as the BIOS allows us to activate it anyway. We can find this option in different places within the BIOS settings, but normally we will find it in the Advanced Options section -> SATA or storage configuration. 

2. Enable TRIM to increase the life of your SSD

It seems silly, but the TRIM prevents the degradation of the hard disk, so, if we want to extend the life of our SSDs, enabling it is a good idea. Windows 10 should have this option enabled by default, but if you want to make sure you can do it from the system command line. We open a command prompt window and type the command "fsutil behavior set DisableDeleteNotify 0". Remember to run it as administrator. 

3. Enable or disable disk defragmenter?

The disk defragmenter has always helped us to organize documents on our computer and remove cache. About having this option enabled or not when we have an SSD installed there are many theories around the network, but with the latest changes introduced in Windows 10, the correct thing to do seems to leave it enabled. 

With the arrival of SSDs, it was found that the defragmenter caused a considerable reduction in the number of read and write cycles, so it was detrimental to have it activated. It made the disk somewhat slower and a more heavily loaded process that caused the SSD to wear out quickly.

However, with Windows 10 this problem has disappeared. The defragmenter is now called "Drive Optimizer" and it does not harm performance or wear out our SSD. As we think this is a good thing, since the process that is carried out is different from that of defragmenting the SSD, it is best to leave it activated so that it runs periodically. We can change the settings to run daily, weekly, or monthly. We recommend the latter.

4. The Prefetch and the Superfetch

The Prefetch is a service in charge of copying files that have been recently opened and storing them in an area adjacent to the hard disk. It serves so that when they are accessed again, it can be done quickly.  It is not necessary to have the prefetch activated because the SSD does this job and takes the same time to access a file. This is why this service loses its meaning a bit, so having it activated is only consuming RAM.

The Superfetch is a service that handles preloading widely used programs on our team. Like the prefetch, it uses memory space to accelerate that fast start and it is quite absurd to have it activated, since we are eating a space of RAM that our SSD can take advantage of, since it is capable of doing the same just as fast.

To deactivate Prefetch and Superfetch, open the Windows "Registry Editor" and navigate to the following path: HKEY_LOCAL_MACHINE \ SYSTEM \ CurrentControlSet \ Control \ Session Manager \ Memory Management \ PrefetchParameters. Once here we will set the value 0 to the EnablePrefetcher and EnableSuperfetch options. 

If the EnableSuperfetch value does not appear in the registry, then disable the Sysmain service in Start -> Services. 

5. Update the SSD firmware

This seems obvious, but some people overlook it. When we install an SSD in our computer we have to make sure that the firmware is up to date and thus can offer absolute performance. If we do not know if our SSD is up to date we have to go to the website of the manufacturer of our disk and look for updates available.

Manufacturers can upload updates of their products to their official websites, it is good that we are aware of that. To know the version we have of SSD (if you do not know), there are online tools that can provide you with that information. Once we know the version we have, we can see if there are new updates available and keep our disk updated. 

6. Disable the search index of your SSD

By default, Windows makes an index in which it points in which area of ​​our SSD each of our files is stored. This made a lot of sense when using slow, mechanical hard drives, but thanks to the SSD's read and write speed, it is no longer necessary to have it active, therefore, if you want to optimize your SSD, you will have to disable it.

How do you do this? Well, it is very simple. Enter "My Computer", find your SSD hard drive and enter "Properties" by pressing the second mouse button on it. At the bottom of the "General" tab you will find the indexing option, you just have to uncheck the box and apply the changes.

7. Disable Windows fast startup

When we put our laptop to sleep or close the lid, Windows saves the state of our activity in a small hibernation fileThis means that every time we do it, we are spending read / write cycles of our SSD. Although the effect is not at all worrisome, in the long run it can affect the lifespan of the hard drive. 

In this case you must decide. If you prefer a somewhat faster system resume in exchange for a bit of the life of your SSD, leave the fast boot option enabled. If, on the contrary, you are more concerned about lengthening, even if only a bit, the useful life of your SSD, then deactivate it.  You can do it in Start -> Control Panel -> Choose the behavior of the start / shutdown buttons -> Change the currently unavailable settings. After that uncheck the option "Activate fast start" and press Save Changes. 

8. Disable paging file cleanup

There are some options in Windows that are no longer necessary if we have an SSD disk. To increase the general performance of our computer, we can deactivate the cleaning of the paging file , as this does not improve the performance of our computer, due to the high speed of solid state disks, but it does consume write cycles. 

Disabling it is as simple as entering the "Registry Editor" and looking for the following key: Computer \ HKEY_LOCAL_MACHINE \ SYSTEM \ CurrentControlSet \ Control \ Session Manager \ Memory Management. Set the “LargeSystemCache” and “ClearPageFileAtShutdown” values ​​to 0. This doesn't speed up your SSD, but it will save you a good number of load cycles throughout its useful life.

9. Configure your SSD cache

To optimize your SSD and find the balance between life and speed, we recommend disabling the write cache.  This option speeds up access to the data on the hard disk, but taking into account the read / write speed that is handled today, it is no longer necessary to keep it active, since all it does is consume read and write cycles. 

To disable the SSD cache we have to enter its properties and select the Hardware tab. Click on your hard drive, click on properties and then on the option to change settings. Finally, deactivate the option "Enable write cache on the device" and click OK. 

10. Check the status and speed of your SSD

How can we know if these changes are affecting the performance of our SSD or not? Well, my simple, measuring it through a reading and writing speed test.  The best known program to do this is called CrystalDiskMark, and it is completely free. With it you can perform performance tests in a very simple and fast way. In this way, you can accurately check if all the changes made are serving to optimize your SSD or not. 

As far as the longevity of your SSD for Windows is concerned, we can use tools such as CrystalDiskInfo or SSD Life , which provide us with technical information about the health of our hard driveSo we can check if our SSD is close to reaching its useful life or not. In any case, remember that an SSD disk can function optimally for at least 10 years, as long as we take good care of it and make normal and current use.

5/08/2022

Best cheap USB microphone for streaming 🎤 Trust GXT 232 Mantis

My choice for the best usb microphone for streaming is Trust GXT 232 Mantis wich offers us the best sound quality without spending a fortune.


Trust GXT 232 Mantis. Live Broadcast Microphone Review 

Included accessories 

cheap USB microphone for streaming
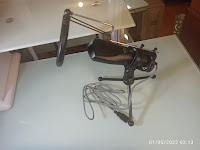
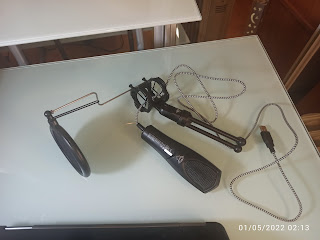
The Mantis GXT 232 comes with an adjustable table stand with integrated damper and pop filter. All of these factors allow us to use the microphone right out of the box. Plug-in function and performance! One of the best features of the GXT 232 Mantis is definitely that it is Plug & play, which means that we take it out of the box, plug it in and start using it.. 

Thanks to this microphone, the only thing we need is a free USB port and we will have everything we need to start recording podcasts or broadcasting live. And the mantis is equipped with a tripod that includes a shock mount. An ideal accessory that will prevent the vibration of the most sensitive parts of the microphone that could damage the quality of our audio, for example, when we hit the table or accidentally move the microphone. 

Technical specifications 

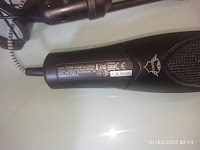
  • label on Trust GXT 232 Mantis
    Weight: 8.8 ounces 
  • Connection: USB 1.38 x 1.97 x 6.1 inches 
  • Cable length: 59-inch
  • Microphone type: Condenser 
  • Pattern: Omnidirectional 
  • Impedance: 32 Ohm 
  • Sensitivity: -38 dB 
  • Response frequency: 50 Hz – 16000 Hz.
 The Trust Mantis GXT 232 is made almost entirely of plastic, except for the grille that covers the microphone diaphragm. While the lack of metal or a material harder than plastic may indicate inexpensive equipment, the strength of the material used does not give the impression that the material is brittle. The microphone does not have volume or gain controls and its connection is USB type to simplify its operation as much as possible. 1.5-meter braided connection cable; It contributes to its durability and prevents damage from bending the cable or accidentally stepping on it with certain elements during our installation that would damage the cable. 

Concluding about the best cheap usb microphone for streaming

tripode with shock mount and pop filter


The quality is, of course, very good, giving it a good value for money. As a last comment about the Mantis GXT 232, we can only say that apart from the practicality, they do not require anything more than connecting them to our PC or laptop, or even to a PlayStation 4.
 
This mantis allows us to exponentially increase the quality of the sound if we compare it with the microphone integrated in our laptop. Although it is not a professional microphone, the jump in quality that you get in your live transmissions is impressive.